Truth #12
It takes very few items to have a complete and working makeup bag.
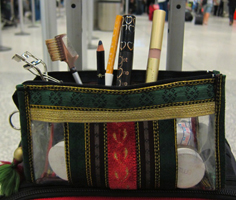
In an attempt to make holiday plane travels a bit easier, I squeezed everything I needed for four days into a carry-on suitcase. My professional makeup stockpile leaves me with just about a thousand products in every color at my disposal. Narrowing it all down to a tiny bag meant editing wisely, and I based my selections on a quote I heard once from a long-time, famous makeup artist. He said that a true artist could create a full makeup look with just a brown pencil and some concealer. In reality, my personal/daily makeup bag (pictured – at the airport!) isn’t much bigger than that, and I truly believe that yours doesn’t have to be either.
You may not consider yourself a professional makeup artist, but there’s a lot of truth in keeping it simple. In fact, not having too many products helps you stay efficient and keeps the focus on highlighting your best features.
In my makeup travel mix, you’ll see there’s a bit more than just brown pencil and concealer, but it’s still very pared down; yet offers plenty of options for day or night. To boot, not one thing on the list is considered a liquid by the TSA. So that leaves more room to bring favorite skin and hair care items!
My travel makeup essentials:
- RMS Beauty Un-Cover Up #22
- RMS Beauty Cream Eyeshadow in Seduce
- (Used as both an eyeshadow and a cheek contour/bronzer).
- Jane Iredale Liquid Mineral Concealer #4
- (A pink tone for canceling out blue under the eyes).
- Dr. Haushka Duo Eyeliner #4
- (The navy side acts as my more dramatic option, and the grey side is for creating a softer look.)
- Kevyn Aucoin Eyelash curle
- Josie Maran GoGo Mascara
- Shobha eyebrow pencil in Sand
- (It comes with space saving sharpener on the end, which I also use to sharpen the Dr. Hauschka pencil. It’s also a great color for subtle lining under the eyes).
- A brow/lash comb
- (This is great for both blending the brow color and de-clumping mascara.)
- Alima Pure tinted lip balm in Fig.
- (A great color that has just the right amount of pinky brown with a touch of gold that can complement any outfit or occasion).
- Bite Beauty Lip Rouge in Apple
- (A fairly universal warm red shade to liven up cheeks and offers another option for lips).
Using all the items above will create a pretty and polished daytime look, and for a more sophisticated option, simply add more of #4, #6 and #10 until you achieve the desired effect. Unless your complexion is similar to mine (very light skin), you’ll have to adjust the tones to best fit you, but the overall product selection should remain the same.
If you are going out on the town and want a more dramatic visage, it’s entirely possible to create a smoky eye with just four of the products from the list above.
The minimalist’s smoky eye in 7 steps:
Step 1: Curl the eyelashes (product #5)
Step 2: Apply the gray pencil (product #4) using the flat side rather than the point to cover the eyelid in a wash of color. This doesn’t need to be perfect. You’ll blend it later.
Step 3: Rim the upper and lower eyelashes with the navy side of the eyeliner (product #4). Do not connect the inner corners. Then lightly sketch with the point of the pencil a soft line into the crease of your eye to create depth. Be sure to check this with your eyes open so you make sure that you can see the color and you aren’t using a shape that will drag your eye downward.
Step 4: Put a teeny, tiny bit of cream eyeshadow (product #2) on your ring finger and use that to lightly smudge the colors together. Start on the center of your eyelid and work up and out. Try not to go too heavy as you work towards the nose or it will make you look like you have a black eye.
Step 5: Use your pinky to lightly buff and soften the lower eyelash line you drew. Again, work up and out, not inward.
Step 6: Add mascara to upper and lower lashes. (product #6)
Step 7: Clean up any product that may have fallen under your eyes and add concealer as needed.